DIY TIME!!
So as it is back to school time, and everyone is in the organizing mood, I have also been thinking about my own set up of things and what I will be bringing with me back to college. As well as buying things for my first on-campus apartment, I tend to live by the motto, "If I can make it for cheaper, why buy it?" Plus I am just a pretty crafty and creative person in general so any time I can make something I kinda jump on the opportunity if I feel it will come out lookin' good. This DIY came about because I have a jewelry box that I love but I cannot efficiently store my long or even short necklaces in it and remember to wear them. So I thought it might be fun to make a cool corkboard, like the ones that have ribbon on them that people put pictures on. Instead I thought I would make mine for jewelry! (just as a word of advice, use the pictures to guide you)
For this DIY Jewelry Board, you will need a few items:
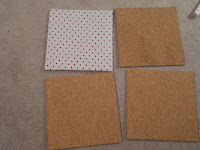
4 square pieces of cork board; I picked mine up in a set of 4 at Michaels
A glue gun and glue sticks
2 square pieces of fabric in a pattern or color of your choice; you could also choose two different colors or patterns, just make sure there is enough to cover an entire square board plus three and a half inches on all four sides; I got my squares at ACMoore and they are called Fat Quarters
Scissors(not shown)
Optional:
1. Something to put your glue gun on so that it doesn't drip all over your work surface; I used a black box in a plastic bag
2. A weight to hold your square pieces in place; for that I used a box of pastels I had laying around
Step 1:
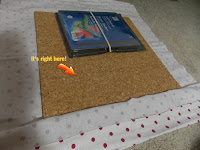
 You're going to want to start with one of your cork board squares and one square of fabric. I used a board that's 12"x12" and the fabric was a pre-cut rectangle measuring 18"x22". Take the fabric and lay it out flat, back-side up. Then lay your board down as close to center of the fabric as possible; you can measure it to be precise if you want. Make sure that if your fabric has a symbol of some sort that it is center as well. Once you make sure that the fabric is completely flat and pulled taut behind the board, place your weight on top to hold the fabric and corkboard in place.
Step 2:
Decide which side you are going to adhere to the back of the board first. You are going to take the fabric hanging off this side and fold the end up about an inch onto itself. Secure this inch by running some hot glue along the inside and folding the other side over.
 After gluing the folded inch part, take the side of fabric and
pull and fold it as far on top of the cork board as possible without it
becoming loose from under the square(this is why the weight is there).
Mark where the fabric reaches(that's what the arrow is pointing to). Lay a line of hot glue on the thin side
of the corkboard and press the fabric over it to create a tight seal. Then squeeze a ton of hot glue on the area of cork board between the line and fabric. Secure the piece of fabric into place
 on the board.
Step 4:
Repeat steps 2 and 3 with the opposite side of fabric and board.
Step 5:
After securing two sides of fabric, which should be opposite each other, I found it helped to cut off the bit of fabric that was folded over and glued. It makes it look cleaner and insures that everything is straight but it is too thick to be able to secure other two ends. Cut off the inch section of the already secured sides.
Step 6:
First thing you have to do is make another inch fold like you did in step 2. Take an inch of the new side and fold it over itself. Secure this with glue.
Step 7:
Next, you are going to fold this side,
as well as the opposite side, like you are wrapping
of the unsecured side and fold them in along
the edge so you get a triangle; secure this with
a bit of glue.
 Step 8:
Once the corners are secure, fold and pull the fabric side up along the board and mark it like in step 3. Also like in step 3, line the thin part of the board with glue and press the fabric taut over it to create the tight seal. Finally, cover the part of the board between the edge and the line in hot glue and secure the fabric in place.

Step 9:
Repeat steps 5, 6, 7, and 8 to the opposite and final side of fabric. When you have done so and flip it over, you should have a tightly covered piece of corkboard.
Step 10:
The final step is to repeat all previous 9 steps to either one or all three remaining corkboard squares. I have done only two but like I just said you could cover all four or even do three and leave just one blank. You could also use different fabric on each board you cover, or like myself, use the same on both boards.
I hope you guys enjoy this DIY Tutorial and if you would like me to do more and other types of DIYs it would be my absolute pleasure. Hopefully the pictures helped with this since I know it was a little hard to explain everything I was doing. Don't forget to tell me what you thought of this, be sure to try it out on your own, and if you could follow my blog that would be great! Talk to you guys soon.


No comments:
Post a Comment